Tuesday, May 06, 2025

One-Skillet Cheesy Beef and Macaroni


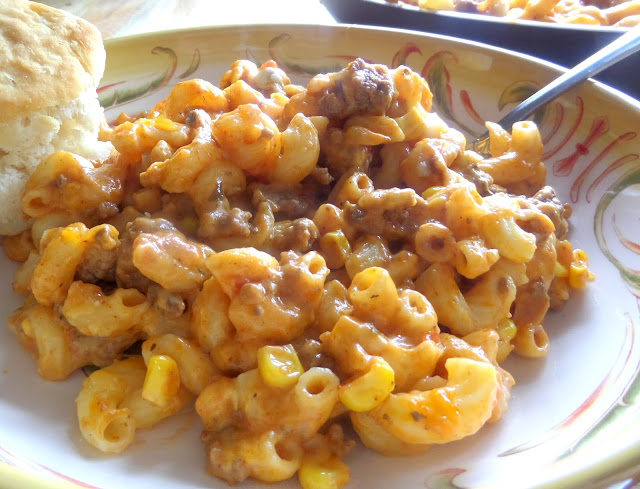
There’s nothing fancy about this simple casserole, but it’s guaranteed to satisfy the taste buds! This is total comfort food with all the ingredients in one skillet…even the pasta!

One-Skillet Cheesy Beef and Macaroni

1 pound elbow macaroni noodles

1 pound ground chuck or lean ground beef

2 cloves garlic minced

1 cup diced onion

1 can (15-1/4 ounces) whole kernel corn, drained

1 can crushed tomatoes 28 oz

½ cup tomato sauce, I use Ragu Chunky Garlic and Onion

3-4 tablespoons tomato paste

½ teaspoon dry basil

salt & pepper to taste

2 cups sharp shredded cheddar cheese, divided

1 cup of white shredded cheddar or use Monterrey Jack

¼ cup freshly shredded Parmesan cheese

3 tablespoons chopped fresh parsley divided


Preheat oven to 375 degrees.

Boil your noodles for ¾ of time according to package. If the box says 9 minutes for example, cook them for 6.  Drain well and set aside.


Meanwhile, brown beef, garlic & onion in a deep and large oven   proof skillet, using a wooden spoon to break it up as you go.  Drain the fat and return to the stove.  NOTE:  If your skillet is not oven proof, you can use a 9 x 13 casserole dish and bake it in the oven.


Combine canned corn, ground beef, drained noodles, crushed tomatoes, tomato sauce & paste, basil, salt & pepper, 1 cup of cheddar cheese, 2 tablespoons fresh parsley. Combine remaining cheeses with the Parmesan and cover the top completely.  Sprinkle with the tablespoon of parsley. 

Transfer skillet to the oven with a baking dish lined with foil to  catch any drips. Bake uncovered for 35-40 minutes or until bubbly and cheese is browned!

Serve with a homemade buttermilk biscuit!  Now that's comfort! 


 Photography is the property of and copyrighted to Welcome Home.


Print Friendly and PDF

Monday, May 05, 2025

Creamy Monterrey Chicken Enchiladas

 Creamy Monterrey Chicken Enchiladas


I love this recipe.  It is so creamy and cheesy and has just to right heat to make it not so spicy. This is my go to when I feel like making a great Mexican dish.


Creamy Monterrey Chicken Enchiladas


2 cups Rotisserie Chicken, shredded and warm

1 cup Mexican Blend Cheese, shredded

10 oz can Rotel, undrained (diced tomatoes & green chilies)

1 cup Sour Cream

1.12 oz Chicken Fajitas Seasoning, packet

10 Flour Tortillas


For the Sauce


5 tbsp Butter

3 tbsp Flour

2 cups Chicken Broth

1 1/2 cup sour cream

4 oz can Diced Green Chilies, mild or hot

2 cups of Monterey Jack Cheese, shredded


Preheat the oven to 350°degrees.

Spray a 9×13-inch baking dish with cooking spray.

Remove the chicken from the bone and place in large bowl.

Add the shredded Mexican cheese, sour cream and the chicken fajita seasonings to the bowl. Mix together until combined.


Evenly divide the chicken filling between each of the flour tortillas. Roll the filled tortilla shells and place each one seam side down in the prepared baking dish as you go.

In a saucepan, melt the butter, then whisk in the flour and allow roux to thicken for about 45 seconds, stirring constantly.


Add chicken broth, bring to a low simmer, and whisk until smooth. 

Next, add the sour cream and diced green chilies. Stir continuously until the sour cream is dissolved and the sauce is warm.


Pour the sour cream sauce over the tortillas and top with the Monterey Jack shredded cheese.

Bake covered for 45 minutes or until golden and bubbly. Remove foil and broil for an additional 1-2 minutes to achieve a crispy topping.


Print Friendly and PDF

Chocolate Ganache Walnut Brownies


These delicious brownies with a rich chocolate ganache layer are the ultimate decadent dessert. Moist, fudgy brownies and creamy ganache that stay moist for days which makes them perfect for making the night before and serving the next day. The brownie is rich and decadent and perfectly chewy. 

 Chocolate Ganache Walnut Brownies


2 cups sugar

1 cup unsalted butter, cubed

1 cup dark cocoa powder

1 teaspoon instant espresso powder

1 teaspoon kosher salt

5 large eggs at room temperature

2 teaspoons pure vanilla extract

¾ cup all-purpose flour

1 cup chopped semisweet chocolate chips 

Preheat the oven to 350° degrees.  Line the bottom and sides of a 13 × 9-inch baking dish with parchment paper, leaving a 1-inch overhang on all sides. Or grease pan with cooking spray.


In a double boiler, or a large stainless-steel bowl placed over a large saucepan of simmering water, or in a large sauce pan over low heat: combine the sugar, butter, cocoa powder, espresso powder, and salt. Cook, stirring occasionally, until the butter is completely melted and the mixture is smooth and glossy.

Remove the bowl from the heat and let the mixture cool slightly, about 5 minutes. Whisk the eggs into the chocolatey mixture one at a time. Add the vanilla and stir to combine.


Fold in the flour and semisweet chocolate chips until no pockets of white flour remain. Transfer the batter to the prepared baking dish.

Bake for 20 to 30 minutes, or until a cake tester/toothpick comes out with a few moist crumbs. Let brownies cool to room temperature in the baking dish over wire rack.

For the Ganache 

12 ounces chopped semisweet chocolate

4 tablespoons unsalted butter, room temperature

2 cups heavy cream 

Place the semisweet chocolate and butter in a large bowl. In a small saucepan over medium heat, bring the cream just barely to a simmer not a boil. Pour the cream over the chocolate and butter. Let stand for 5 minutes, then stir with a spatula until combined and smooth. Spoon the ganache over the brownies in an even layer and place in the fridge for 2 hours or until ganache is set.


Use the parchment paper overhang to lift the brownies out of the baking dish. Place them on a clean cutting board and pull the parchment paper away from the brownies. Run a sharp knife under hot water for about 30 seconds to heat it up. Dry the knife with a clean kitchen towel. While the knife is still hot, cut the brownies into 18 squares, cleaning the knife after each cut. This will help create very clean, crisp cuts.

Serve immediately with a sprinkle of sea salt and/or nuts or add some caramel on top . 


If you want to save any leftovers, lol…. store in an airtight container in the fridge for up to 4 days. 


Print Friendly and PDF

S’more’s Cheesecake

 S’more’s Cheesecake


Who doesn’t love S’mores?  They are one of the first things I think of when summer arrives and I always try to make them at least once or twice during the season.  And when I decided to take my love for s’mores and my passion for cheesecake and create this show stopping no bake dessert for my last cookout, it was no surprise that the room filled with oohs and aahs when I brought it to the table. 

S’more’s Cheesecake

Graham Cracker Crust

2 cups graham cracker crumbs 
¼ cup granulated sugar
½ cup butter, melted

Mix together graham cracker crumbs, sugar and melted butter.
Press on the bottom of a 9 inch spring form pan and up the sides.
Bake at 325 degrees for 10 minutes.  Remove from oven and set aside.

Cheesecake

(2) 8 oz packages cream cheese, softened
1 cup semi-sweet chocolate chips
½ cup cocoa powder
2 cups powdered sugar
(2) 8 oz containers Cool Whip

Heat the semi-sweet chocolate chips in the microwave for about 45 seconds. Stir and continue heating for 15 second intervals, stirring in between, until smooth. Set aside to cool.  


Beat softened cream cheese until fluffy. Add the melted chocolate, the cocoa and the powdered sugar and mix until smooth and creamy. Fold in the whipped topping until well blended.

Spread filling into your spring form pan that has the cooled crust. Refrigerate for at least 1-2 hours.

Topping

1 cup mini marshmallows
½ cup chocolate syrup or hot fudge topping
½ cup graham cracker crumbs


Sprinkle graham cracker crumbs on top of cake.  Top the cheesecake with the mini marshmallows. Drizzle with chocolate syrup.  Slice and serve! 


Photography is the property of and copyrighted to Welcome Home.


I used a 9 inch square spring form pan for this cheesecake.  I have included the link for you to see it on Amazon.com. 


  • 9 inches by 9 inches
  • Durable steel construction with nonstick coating for effortless release
  • Spring latch securely holds form together offering a tight leak-proof seal


https://www.amazon.com/gp/product/B000F7A580/ref=as_li_ss_sm_fb_us_asin_tl?ie=UTF8&camp=213733&creative=399837&creativeASIN=B000F7A580&linkCode=shr&tag=welchome08-20&linkId=RWBI6PQKV5AE5PQC&qid=1473436309&sr=8-3&keywords=square+cheese+cake+pan
Print Friendly and PDF