Wednesday, May 07, 2025

Fried Coconut Flounder with Pineapple Salsa


I’ve been trying to eat more fish lately. I like fish. I feel like I’m eating healthy when I eat fish. Okay so I bread it and fry it in butter and oil. It's all in how you look at it. It’s still much better than all that red meat with tons of fat. Okay so it isn’t but now and then I just feel like fish instead of beef or chicken. I saw some fresh flounder at the seafood counter today and so I bought it. I have had this pineapple staring at me on my counter for a few days now and I have some cilantro growing in my herb garden. Put those things together and you get a wonderful “healthier” meal!

Fried Coconut Flounder with Pineapple Salsa


    Flounder 

      2 flounder fillets, thawed and patted w/ paper towel

1/4 cup flour
¼ cup panko
½ cup flaked coconut
Salt/Pepper
4 tablespoons butter
1 tablespoon olive oil

Pat fish dry with paper towels. In a shallow bowl, add flour, coconut, and panko. Season with salt and pepper.  Lightly dredge flounder fillets in seasoned flour mixture. 


Melt butter and olive oil in skillet over medium heat and fry flounder for about 10 minutes on each side until golden brown. Top with sliced almonds and pineapple salsa.  Enjoy.

Pineapple Salsa

1 cup pineapple
1 clove garlic, chopped fine
1 small sweet onion
1 tablespoon diced green pepper (optional)
1 tablespoon chopped fresh cilantro
½ lime, juiced
1 tablespoon sugar
Salt/Pepper, to taste

Chop the pineapple, tomato and onion in small cubes. Mix all ingredients together and refrigerate at least two hours prior to serving.
 
 Photography is the property of and copyrighted to Welcome Home.


Print Friendly and PDF

Cold and Creamy Pineapple Smoothie

 Cold and Creamy Pineapple Smoothie


What a refreshing treat on a hot summer day!  I love making this smoothie because it's so simple and so tropical!  Some pineapple and sweetened condensed milk. How easy can it be?

Cold and Creamy Pineapple Smoothie  

1 cup cold water 
1/2 cup fresh lemon juice 
1 cup fresh chopped pineapple 
1 (14 oz.) can Eagle Brand® Sweetened Condensed Milk 
2 cups ice cubes 

Combine water, lemon juice, pineapple and sweetened condensed milk in blender container. Blend well. Gradually add ice, blending until thick and smooth.

Top with cherries and a sprig of mint and serve immediately. 

Photography is the property of and copyrighted to ©Welcome Home.
Print Friendly and PDF

Tuesday, May 06, 2025

Classic Chili over Spaghetti Noodles


I know.  You serve your Chili with rice or by itself but I wanted to do something different just to see what it was like with Spaghetti noodles. So, I made my classic chili as I always do but ladled it over a nice bed of soft noodles. Then I topped it with lots of cheese and sour cream.  Looks like Cincinnati Chili if you’ve ever had it but looks can deceive.  This chili is a recipe I have made for years…It was my Mom’s recipe and my Dad’s favorite. Serving it over noodles is a great change up and I think you’ll like it as much as I do.

 Classic Chili over Spaghetti Noodles

2 lbs ground chuck (80/20)

1 tablespoon of my chili seasoning (see recipe below)

1 yellow onion, chopped

2 cloves garlic, minced

1 14.5 oz can crushed or stewed tomatoes

2 tablespoons tomato paste

2 scallions

2 tablespoons Worcestershire sauce

1 tablespoon sugar

2 cans chili beans (optional)

1 box (16 ounces) spaghetti noodles

4 ounces shredded cheddar cheese

¼ cup sour cream


Heat a tablespoon of olive oil in a large deep skillet to medium high heat. Add the diced onion and minced garlic, and season with salt and pepper. Cook, stirring frequently, 3 to 4 minutes, or until slightly softened. 


Add the ground beef breaking it up as you cook.  Add the seasoning blend and stir to combine.  Continue cooking until beef is no longer pink.

Add spice blend and cook, frequently breaking the meat apart with a spoon, 4 to 6 minutes, or until browned Add the ground beef breaking it up as you cook.  Add in the seasoning mixture and stir to combine.  Continue cooking beef until it is no longer pink.


Stir in the tomato paste. At this point if it’s too thick you can drizzle with olive oil to loosen it. Continue to cook stirring frequently for another 3-5 minutes.  Add in the crushed tomatoes and ½ cup of water.  


Add the crushed tomatoes and 1/2 cup of water; season with salt and pepper. Cook on low heat, stirring occasionally, for 30 to 40 minutes. Chili will continue to thicken.

Turn off the heat and stir in the Worcestershire sauce.

Taste and if needed, season more to your liking.


Serve the finished chili over the cooked spaghetti noodles. Garnish with the grated cheese and a dollop of sour cream. Enjoy!


My Chili Seasoning blend

I keep this seasoning mix on the mild to the medium side, but it can easily be adjusted for your flavor preferences. To keep this chili seasoning mix super mild, omit the crushed red pepper flakes. If you like more heat, add some cayenne pepper (I suggest adjusting the flavor in ¼ teaspoon increments of the cayenne pepper).

4 tablespoons chili powder

2 teaspoons smoked Paprika (or regular paprika)

1 tablespoon all-purpose flour

2 teaspoons coriander

2 tablespoons ground cumin

1 teaspoon garlic powder

1 teaspoon onion powder

1 teaspoon dried oregano

3 teaspoons sea salt

4 teaspoons black pepper

¼ teaspoon crushed red pepper flakes

¼ teaspoon cayenne if you want more spice

 In a medium bowl, combine chili powder, garlic powder, onion powder, crushed red pepper flakes, cayenne pepper, oregano, paprika, ground cumin, sea salt, and black pepper.


Store in a jar or any airtight container at room temperature. Stored in an airtight container, this spice blend will keep for up to a year.


When making chili using one pound of ground beef, start with 1 1/2 tablespoons of the seasoning blend and adjust according to your taste.


    Photography is the property of and copyrighted to Welcome Home.
Print Friendly and PDF

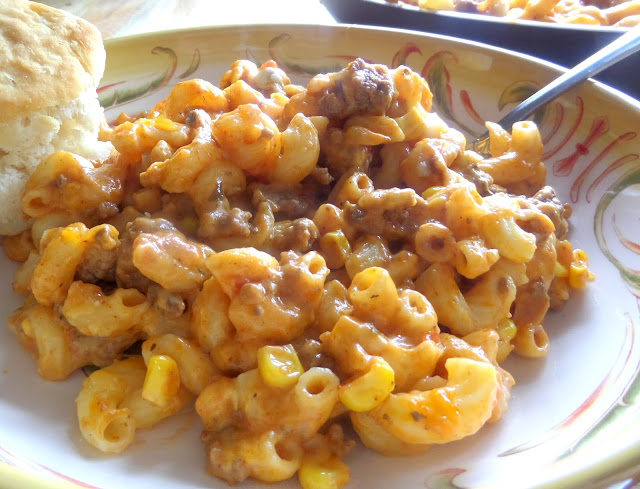
One-Skillet Cheesy Beef and Macaroni


There’s nothing fancy about this simple casserole, but it’s guaranteed to satisfy the taste buds! This is total comfort food with all the ingredients in one skillet…even the pasta!

One-Skillet Cheesy Beef and Macaroni

1 pound elbow macaroni noodles

1 pound ground chuck or lean ground beef

2 cloves garlic minced

1 cup diced onion

1 can (15-1/4 ounces) whole kernel corn, drained

1 can crushed tomatoes 28 oz

½ cup tomato sauce, I use Ragu Chunky Garlic and Onion

3-4 tablespoons tomato paste

½ teaspoon dry basil

salt & pepper to taste

2 cups sharp shredded cheddar cheese, divided

1 cup of white shredded cheddar or use Monterrey Jack

¼ cup freshly shredded Parmesan cheese

3 tablespoons chopped fresh parsley divided


Preheat oven to 375 degrees.

Boil your noodles for ¾ of time according to package. If the box says 9 minutes for example, cook them for 6.  Drain well and set aside.


Meanwhile, brown beef, garlic & onion in a deep and large oven   proof skillet, using a wooden spoon to break it up as you go.  Drain the fat and return to the stove.  NOTE:  If your skillet is not oven proof, you can use a 9 x 13 casserole dish and bake it in the oven.


Combine canned corn, ground beef, drained noodles, crushed tomatoes, tomato sauce & paste, basil, salt & pepper, 1 cup of cheddar cheese, 2 tablespoons fresh parsley. Combine remaining cheeses with the Parmesan and cover the top completely.  Sprinkle with the tablespoon of parsley. 

Transfer skillet to the oven with a baking dish lined with foil to  catch any drips. Bake uncovered for 35-40 minutes or until bubbly and cheese is browned!

Serve with a homemade buttermilk biscuit!  Now that's comfort! 


 Photography is the property of and copyrighted to Welcome Home.


Print Friendly and PDF